Version 1.1.0The biggest update since Menu Planner 2 launched

What’s new in Menu Planner 2

More than thirty new features, from sharing your kitchen with your household to a timer for every step of a recipe. Here’s what each one does, where to find it, and the details worth knowing.

Premium + Sync now costs less

Monthly and annual subscriptions are now $1.99 a month or $19.99 a year in the US (prices in your currency are shown in the app). If you already subscribe, you renew at the lower price automatically — there’s nothing to do. Because a month costs less, unlocking Premium for good now takes eight months of a monthly subscription instead of three, and months you’ve already paid for still count at the old rate. Buying a year still unlocks Premium for good straight away.

Planning meals

5 new features

A new Home tab #

Menu Planner 2 now opens on Home: your day at a glance, for whichever person you’re planning for. It answers the questions you open the app with — what are we eating next, when do I need to start, and do I have everything?

What’s on it

  • Your next meal, with its food and when to start cooking it. Tap Cook to open the recipe or Open Day to see the whole day.
  • Also Today and Tomorrow list the rest of your meals.
  • This Week shows which days still have nothing planned. Tap a day to plan it, or Suggest Meals to fill the gaps.
  • Ingredients not on your list for today and tomorrow, with Add All, or Add for More Days… to look further ahead.
  • Forgotten favorites — recipes you love but haven’t made in a while — plus any running recipe timers and today’s nutrition.
  • Nothing planned yet? Home suggests a few recipes you can put on today with one tap.

Reports

Tap the chart button at the top of Home for Reports: a Weekly Recap (with an optional reminder on the first morning of the week), Grocery Spend by store and per serving, Meal Plan Stats and your planning streak, Nutrition Trends against your goals, Pantry Health (what’s expiring, running low or never used), Recipe Stats, and a Year in Review that appears on Home from mid-December to mid-January.

Good to know

  • New to the app? Home shows a Get Started checklist that checks itself off as you go, then one Did You Know? card a day about a feature you might have missed.
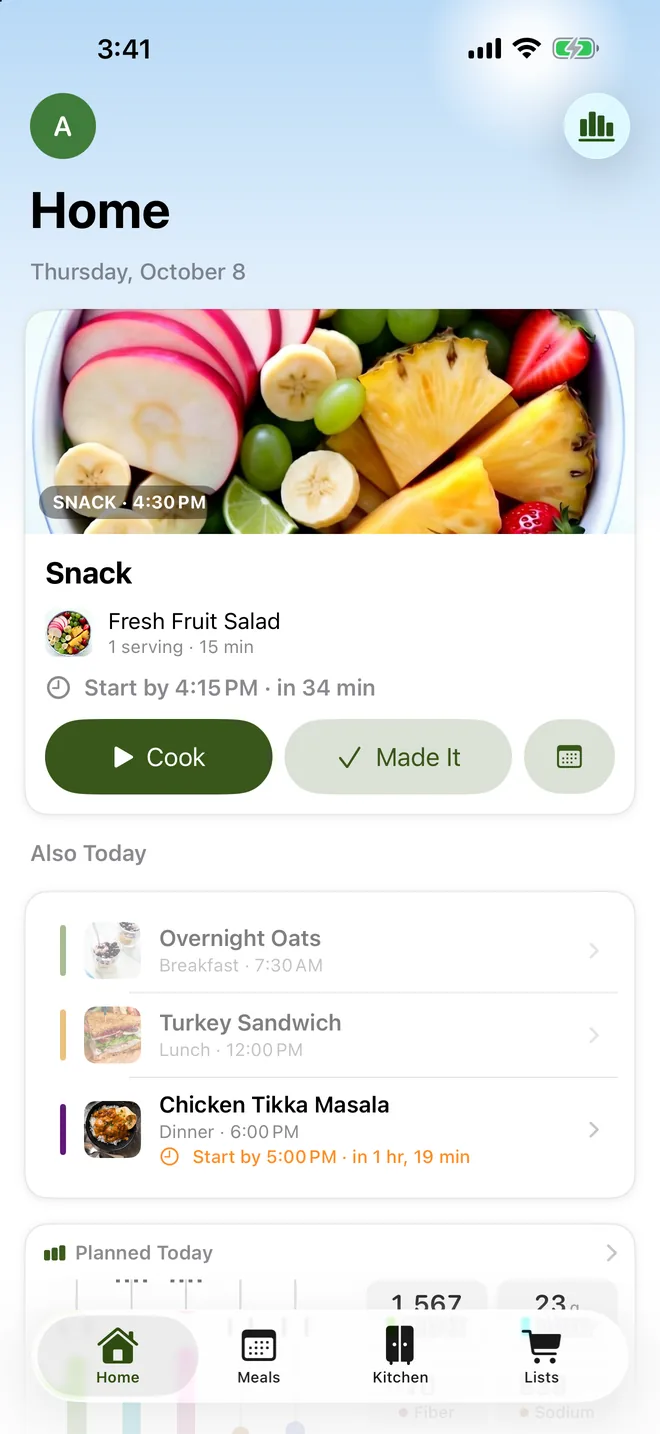
Home: the next meal with its photo and when to start cooking, then the rest of today’s meals

Let Menu Planner 2 suggest meals #

Adding suggestions needs Premium

Out of ideas? Suggest Meals fills a day or a whole week from your own recipes, learning from what you’ve planned before. It never invents recipes you don’t have, and nothing is added until you say so.

How to use it

  1. Tap Suggest Meals (the sparkles button) — inside a day, on Home, or on iPad at the top of the meal plan.
  2. Choose Day or Week, and the meal types you want filled.
  3. Uncheck anything you don’t want, or tap the arrow beside a suggestion for other ideas. Touch and hold one to drag it to another day.
  4. Tap Add.

Good to know

  • Shuffle All gives you a fresh set. Suggestion Settings lets you use only certain tags — say, “Weeknight” — or leave some out.
  • Days that already have that meal are left alone unless you tap Suggest Anyway.
  • Anyone can see suggestions; adding them is part of Premium.

Drag meals between days #

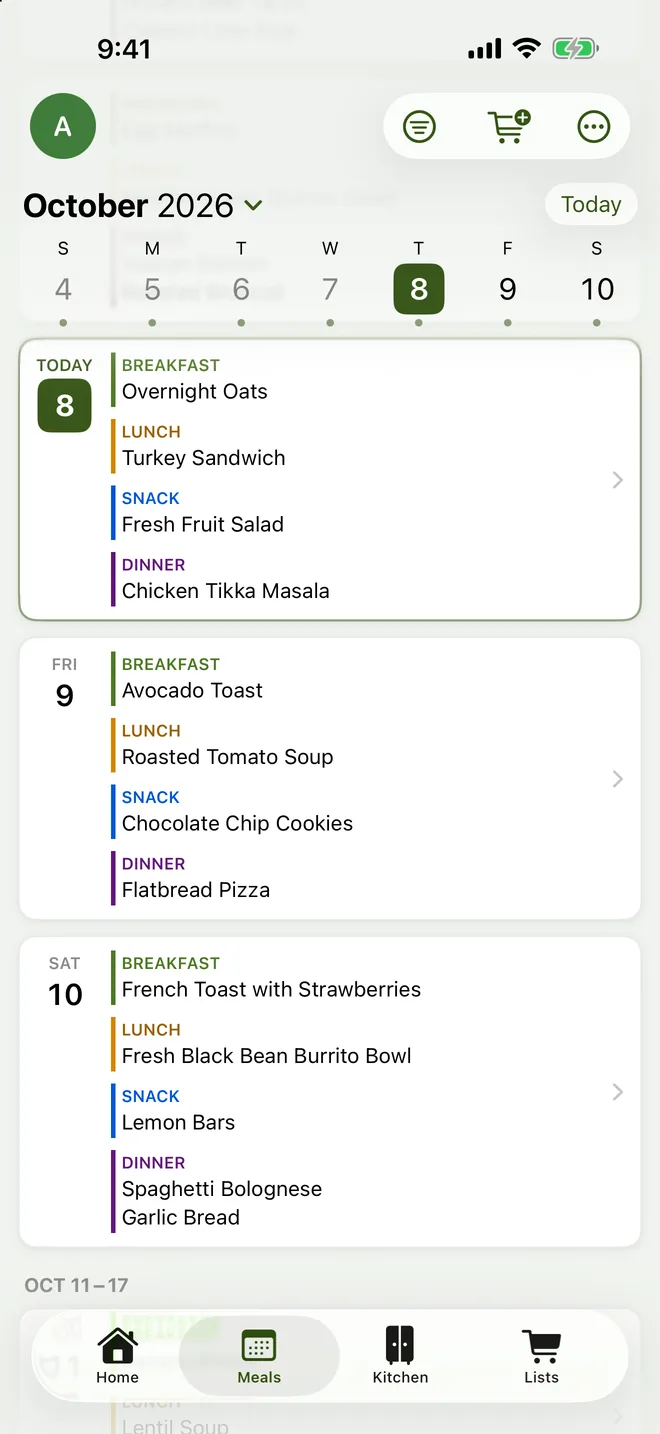
Plans change. Touch and hold a meal, drag it onto another day, and choose Move or Copy when you let go. It works in the list of days on iPhone and iPad, and in the iPad week and month views — where you can also drag a single food, and it lands in the same meal on the new day.

Good to know

  • Prefer tapping? Tap ••• beside a meal and choose Move or Copy, then pick the day. Copy stays open so you can repeat a meal on several days.
  • Whole day? Day Options (•••) has Move All to Date and Copy All to Date.
  • To reorder foods in a meal, touch and hold one and drag it up or down.
Meal plan list of days on iPhone

Scrolling the meal plan #

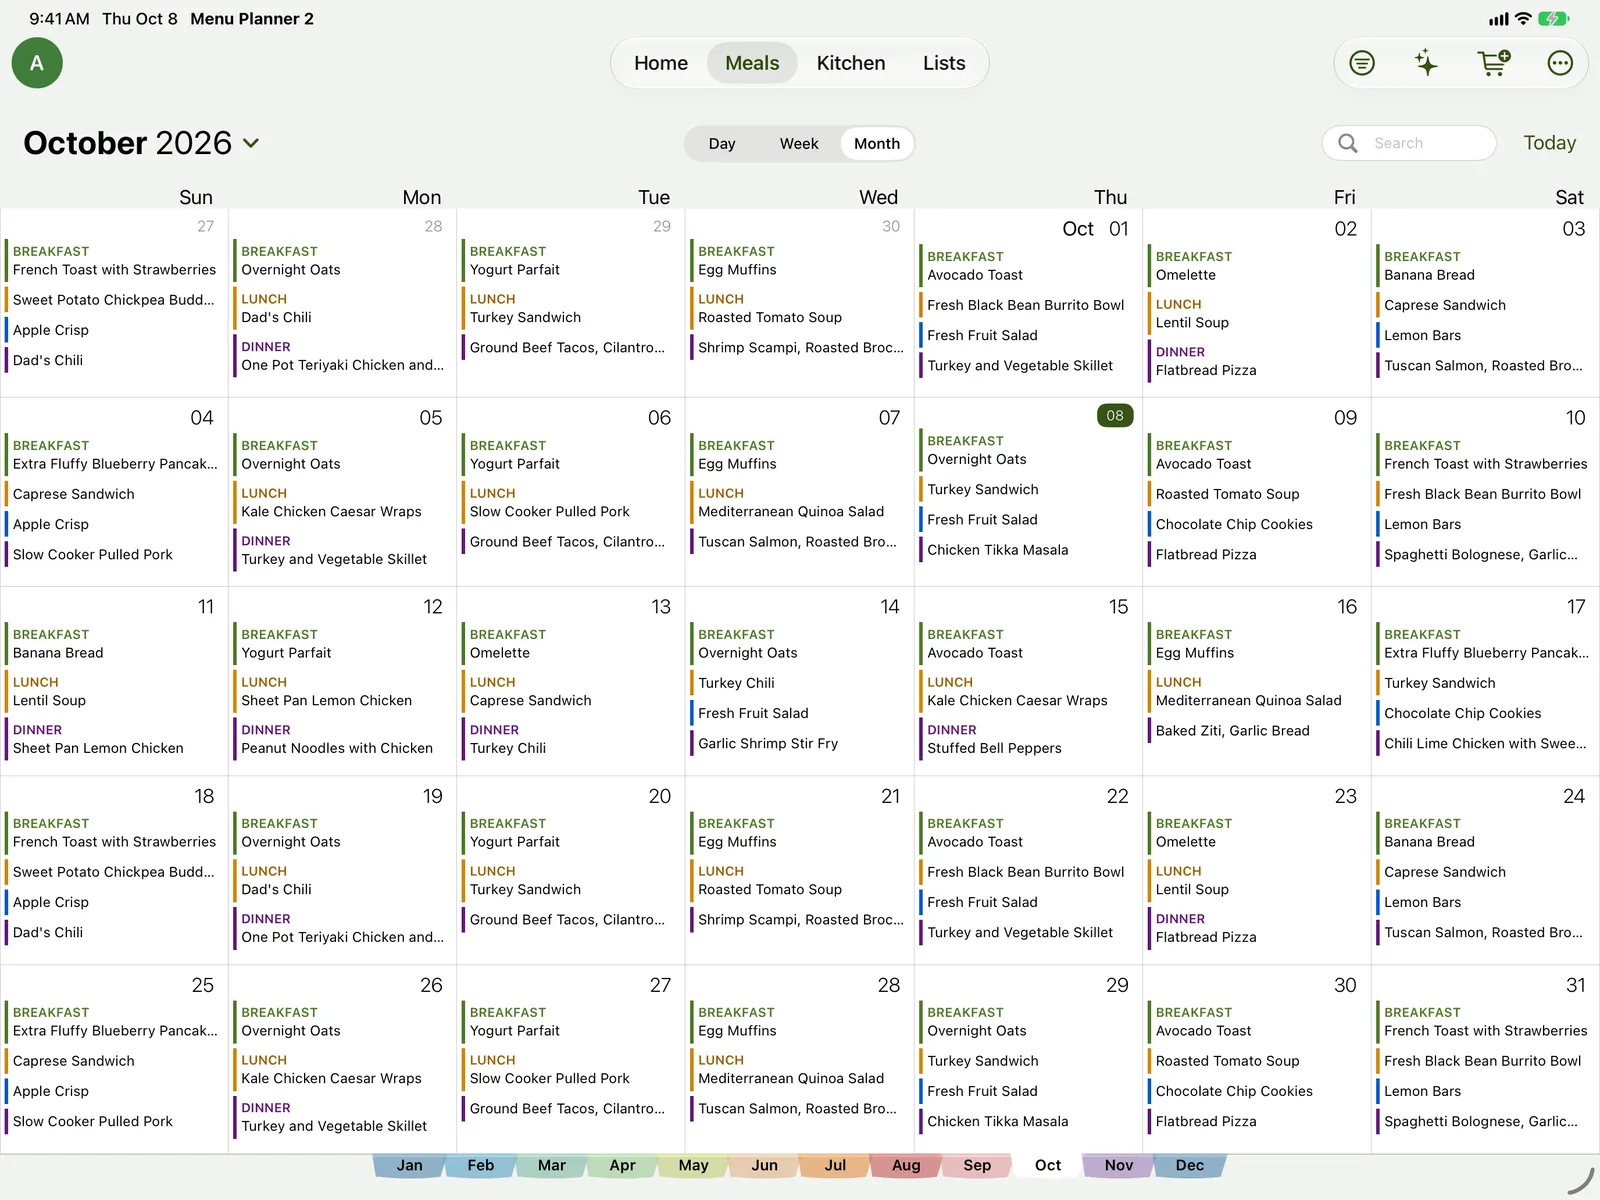
On iPhone, your days now scroll as one continuous list — keep scrolling to move through time, swipe the week strip at the top to jump a week, or tap the month name to go to any date. On iPad, the month view scrolls straight down through the weeks, so a plan that runs past the end of a month reads in one go. Tap a month along the bottom to jump to it, and choose Detailed or Compact from the ••• menu.

iPad month view of the meal plan

Your meals in the Calendar app #

Add one meal: freeKeep the whole plan in sync: Premium

See dinner next to soccer practice. Tap ••• on any meal and choose Add to Calendar to add it as an event. With Premium, turn on Show Meals in Calendar and your meals from a week ago to four weeks ahead stay in the Calendar app, changing whenever your plan does.

How to turn it on

  1. Tap your picture at the top left, then Settings → Calendar.
  2. Turn on Show Meals in Calendar and allow access when you’re asked.

Good to know

  • Meals go in a calendar called Meals. A meal type with a set time shows at that time; the others show as all-day events.
  • Planning for several people? Each person’s meals can go in the main calendar, their own calendar, or nowhere. Share someone’s calendar with just them from the Calendar app, and they see only their meals.
  • You only need it on one device — the calendar reaches your others through iCloud. Google and Outlook calendars added to your iPhone work too.
  • Change meals in Menu Planner 2, not in Calendar: the app replaces its events when your plan changes.

Shopping

4 new features

Add food for planned meals #

Pick the days you’re shopping for, and the food those meals need goes on your list with the right amounts — already added up across recipes, and leaving out what you have.

How to use it

  1. Tap Add Food for Planned Meals — on the Lists tab in List Options (•••), at the top of the Meals tab, or on an empty list.
  2. Pick This Week, Next Week, Next 7 Days or your own dates, and whose meals to include.
  3. Check the lists: To Buy is checked for you, You May Have These are things most kitchens have, and Already Covered is in your pantry or already on your list.
  4. Tap Add.

Good to know

  • If a meal comes off the plan, a Your meal plan changed card on your list offers to take off what you no longer need — or add what a new meal needs.
  • Mark things like salt and oil I Always Have This at Home and planned meals never add them.
  • Tap Meal Plans at the top of your list to see just what’s for upcoming meals, or turn on Show Which Meals Need It.
  • Recipes marked Leftovers on a day don’t add their ingredients again.
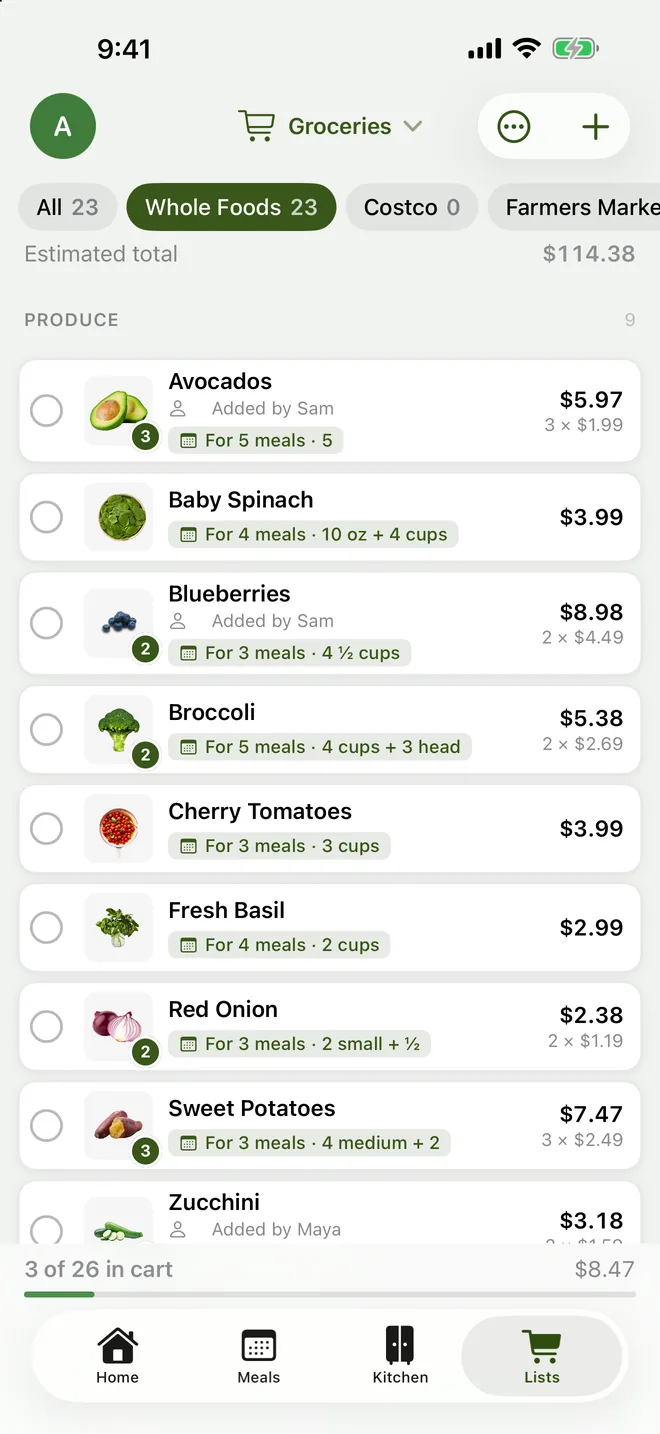
Shopping list items marked as needed for meal plan recipes

A fresh shopping list #

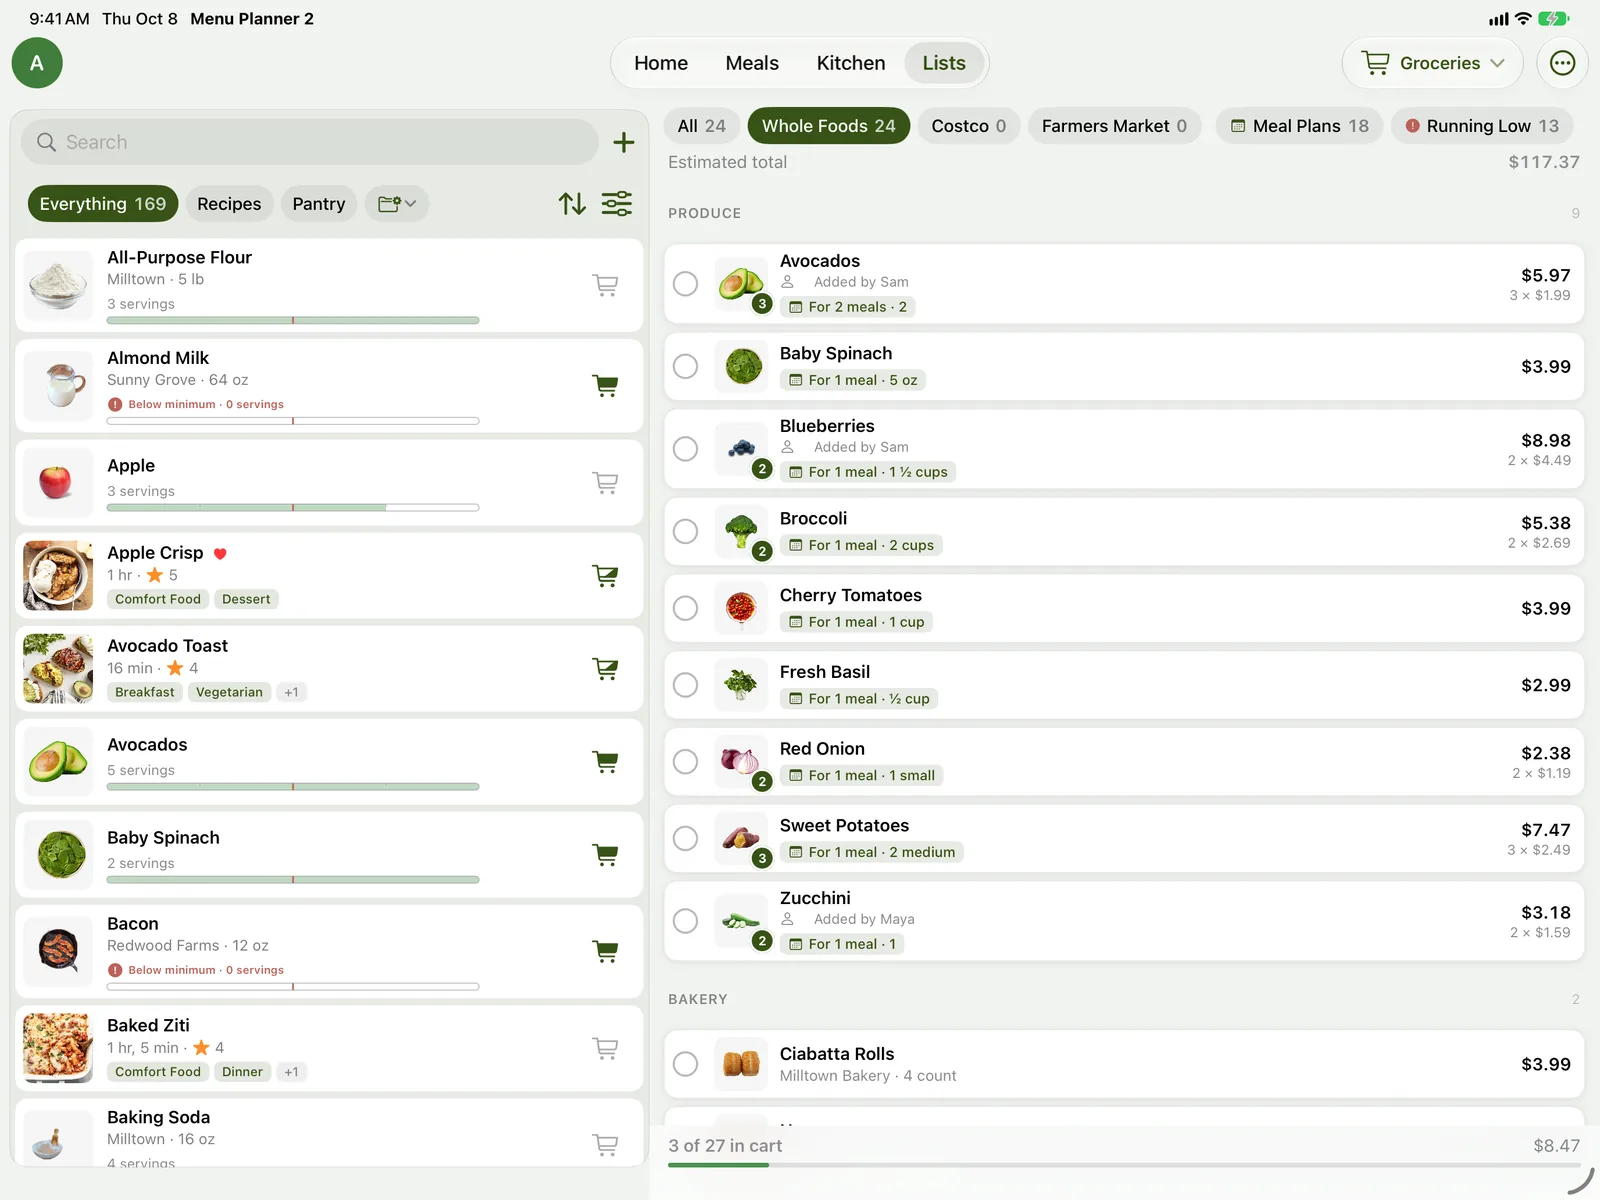
The list has been rebuilt to be easier to read in a busy store. Buttons along the top show All, one store at a time, or just what’s for your Meal Plans, what’s Running Low, or what has No Store yet — each with a count.

Good to know

  • Tap an item to put it in your cart; it moves down to In Cart until you clear it.
  • Tap an item’s amount or price to change how many, the size you’re buying, and the price at each store.
  • Turn on Show Prices for an estimated total and a running total of your cart. With prices at two stores, the lowest is marked Cheapest.
  • Added something to the wrong list? The Added to message has a Change button.
  • Clearing your cart saves what you spent, which feeds the Grocery Spend report.

Stores that follow the way you shop #

Pick a store at the top of your list and you see it in the order of that store’s aisles. Set it up once and your list walks the store with you.

What’s new

  • Needs an aisle: items with no aisle wait at the top of the list, where one tap puts each in its place — usually with a Suggested aisle worked out from your other stores. Tap Assign to go through them one after another.
  • Switches to the store you’re at: give a store a location (tap Use My Current Location while you’re there, or search for it), and your list switches to that store when you open it there. Your location is only read when you open your list, never in the background.
  • Learns your route: after three trips, if you check things off in a different order from the store’s aisles, the app offers to put the aisles in the order you actually walk them.
  • Copy a store: a new branch of the same shop can start as a copy of one you already have, with every item in the same aisle.
  • Standard Aisles: a starter set of 22 common aisles, so you don’t start from nothing.
iPad shopping list sorted by aisle

One item, more than one size #

Buy the same thing in a 12-pack and a 24-pack? Keep both on one pantry item. Every size shares one count of what you have, one set of nutrition facts and the same recipes — but each has its own barcode and its own price at each store.

How to use it

  1. Open the pantry item, tap Edit, then Other Sizes.
  2. Tap Add Another Size and enter the package size, how much it holds, its barcode and its prices.
  3. On your shopping list, tap the item and pick the Size you’re buying.

Good to know

  • Best value marks the size that costs least for what it holds.
  • Scan the barcode of a new package and you’re asked whether to add it as another size.
  • Have the same product in your pantry twice? Combine with a Duplicate Item… makes one a size of the other and moves its recipes, plans, lists and history over.

Cooking

4 new features

Cook Mode #

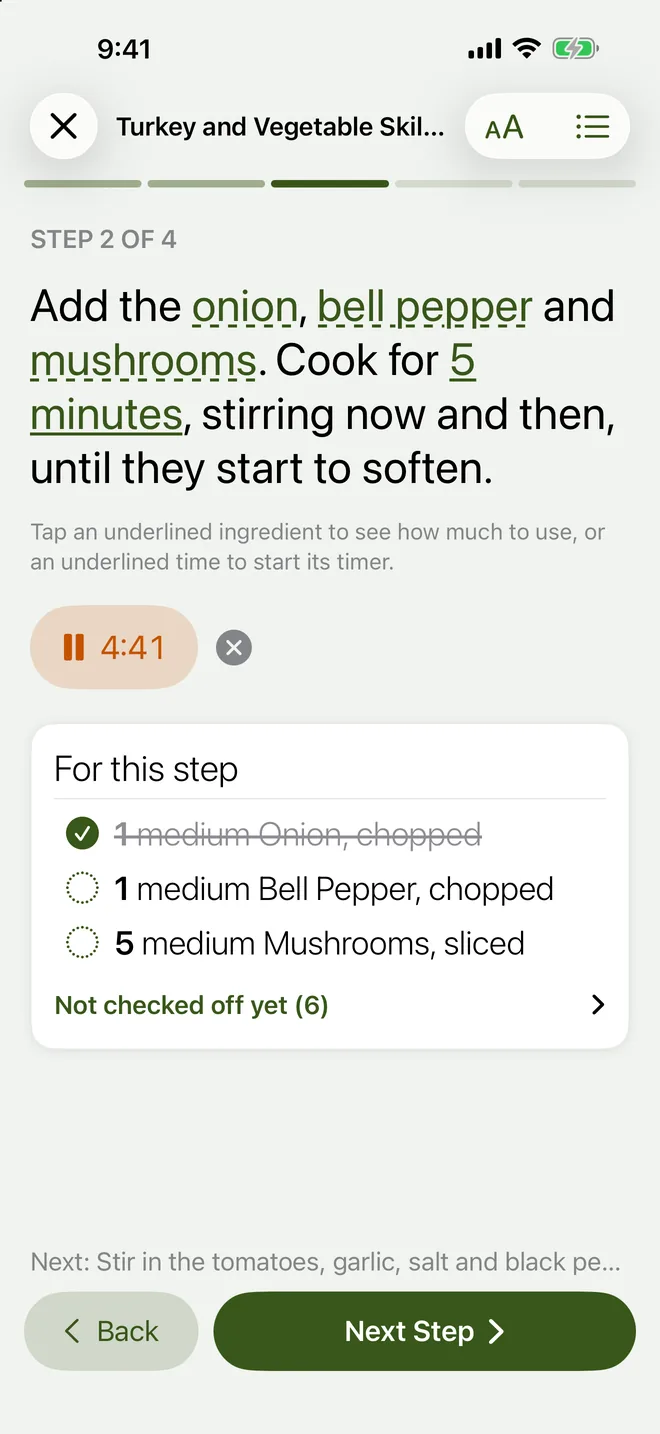
Tap Start Cooking on any recipe to see it one step at a time, in big text you can read from across the kitchen. Your screen stays on.

How it works

  • Get Ready comes first: everything you’ll need, for the number of servings you’re making, so you can get it all out before you start.
  • Each step shows the ingredients it uses under For this step, with amounts. Check each one off as it goes in.
  • Tap an underlined ingredient in a step to see how much to use, or an underlined time to start its timer.
  • Swipe, or tap Next Step and Back. Aa makes the text even bigger.
  • After the last step, All Done lets you rate the recipe and record that you made it.

Good to know

  • Close Cook Mode part way and the recipe remembers your step — its button says Continue Cooking.
Cook Mode: one step in large type, a running timer, and the ingredients that step uses

Timers in recipe steps #

When a step says “simmer 15 to 20 minutes”, a timer button appears right under it. Tap it to start, tap again to pause, and tap ✕ to reset. For a range, it counts down the shorter time so nothing burns.

Good to know

  • Run as many timers as you need at once — the rice, the sauce and the oven.
  • They keep going when you leave the recipe or lock your phone, and let you know when they’re up.
  • On iOS 26 and later, each timer shows on the Lock Screen and in the Dynamic Island, rings even if your phone is silenced or in a Focus, and tapping it takes you straight back to its step.

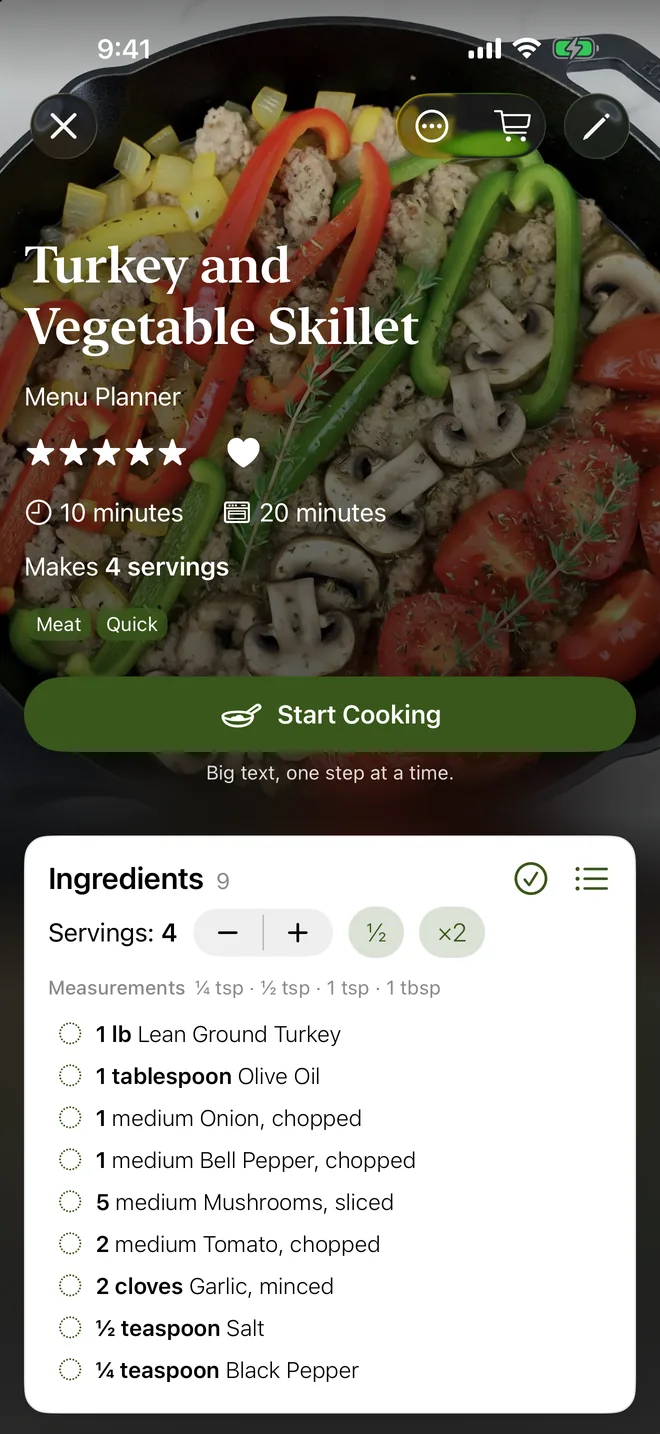
A redesigned recipe view #

Recipes have a fresh layout built for cooking from. Tap a step in the directions and the ingredients it uses light up. Tap an ingredient to check it off as you go; the checkmarks clear themselves after a few hours.

Good to know

  • Recipes without a photo now show a drawing based on their name, instead of a blank square.
  • Change servings with − and +, or tap ½ or ×2. Every amount updates, ranges like “2–3 tablespoons” included.
  • Don’t want the highlighting or the drawings? Turn either off in Settings → Recipe Display.
Recipe page with photo, rating, times, tags and servings

Recipes in metric or cups #

Show a recipe’s amounts in metric or in US cups and spoons, from the menu above its ingredients. Metric uses grams when the food’s weight is known, so “1 cup flour” can become “125 g flour”.

Good to know

  • Cups and spoons aren’t the same size everywhere. Choose yours in Settings → Cups and Spoons: US (240 ml cup), UK, Canada and most of Europe (250 ml), Australia (250 ml cup, 20 ml tablespoon), or Japan and Korea (200 ml).
  • Nutrition totals and pantry amounts use the same sizes, so everything adds up right.

Recipes and Kitchen

7 new features

More ways to add a recipe #

On the Kitchen tab, tap + → New Recipe and choose how:

  • From Camera — scan a page of a cookbook. With Apple Intelligence, the name, ingredients and directions are sorted out for you; otherwise you highlight each part.
  • From Photo — pull a recipe out of a picture already in your library.
  • From Pasted Text — paste a recipe from anywhere. Servings and times at the top are picked up too.
  • By Dictation — read it out loud (devices with Apple Intelligence).
  • Find on the Web and From Other Recipe Apps — see below.

Good to know

  • Share a web page, text, photo or PDF to Menu Planner 2 from any app. On iPad, drag one onto the Kitchen tab.
  • Just want to cook it tonight? Choose Cook Now to open the recipe without saving it. Tap Save if it’s a keeper.
  • Clean Up tidies messy imported text — stray symbols, joined steps, split lines — and fills in prep and cook times it finds in the steps.

Find recipes on the web #

Search the web for recipes without leaving Menu Planner 2. Tap + → New Recipe → Find on the Web, type what you want to cook (or paste a recipe’s web address), and open one you like. When the page has a recipe the app can read, the Save Recipe button fills in. You stay on the page afterwards, so you can save several in a row.

Good to know

  • If a Kitchen search finds nothing, tap Search the Web to look for it there.
  • Websites you sign in to stay signed in, so recipes behind a sign-in can be saved too.
  • Have a list of recipe links? Paste them all and tap Find Recipes to bring them in together.
  • Some sites don’t publish recipes in a form apps can read. On devices with Apple Intelligence, Menu Planner 2 reads the page itself.

Bring your recipes from another app #

Moving from another recipe app? Tap + → New Recipe → From Other Recipe Apps, pick the app, and follow the steps to export from it and bring everything over at once — photos, ingredients and headings, steps, times, servings, nutrition and where each recipe came from, plus ratings, favorites and the date first saved from the apps that keep them.

Works with Paprika, Mela, Crouton, Recipe Keeper, Plan to Eat, Copy Me That, My Recipe Box, CookBook, Pestle, Flavorish, Grocery, MacGourmet, MasterCook, Meal-Master, Nextcloud Cookbook, RecipeSage and Tandoor. For apps that can’t export, the app shows you the best way to bring recipes over one by one or as a list of links.

Good to know

  • Recipes that look like ones you already have are left unchecked, so nothing comes in twice.
  • Your recipes in the other app aren’t changed.
  • Export All Recipes in Settings saves every recipe, with photos, in a standard file other recipe apps can read. It’s free — your recipes are always yours.

Redesigned ingredient entry #

Put in a whole list of ingredients at once, a line at a time — typed, scanned, pasted or dictated. “2 cups flour, sifted” is read as the amount, the unit, the ingredient and the extra detail. Ranges, cans (“1 (15 oz) can black beans”), counts (“3 cloves garlic”) and notes like “to taste” are understood too.

Then link them to your pantry

Lines that match a pantry item are linked straight away. For the rest, the app suggests the closest item, learning from what you’ve linked before. Tap Review to go through them, or Accept Suggested Matches. Linked ingredients count toward nutrition and can go on your shopping list. Anything you skip stays as plain text — it’s never linked to a guess.

Good to know

  • End a line with a colon — “Sauce:” — to make a heading.
  • A recipe can be an ingredient in another: a sauce, a dough, a spice mix.

Recipes in other languages #

iOS 18 or later

Found the perfect recipe on an Italian blog? When a recipe you import isn’t in your language, Menu Planner 2 offers to translate it before you save. Translation happens on your device — the recipe isn’t sent anywhere.

Recipes + Pantry is now Kitchen #

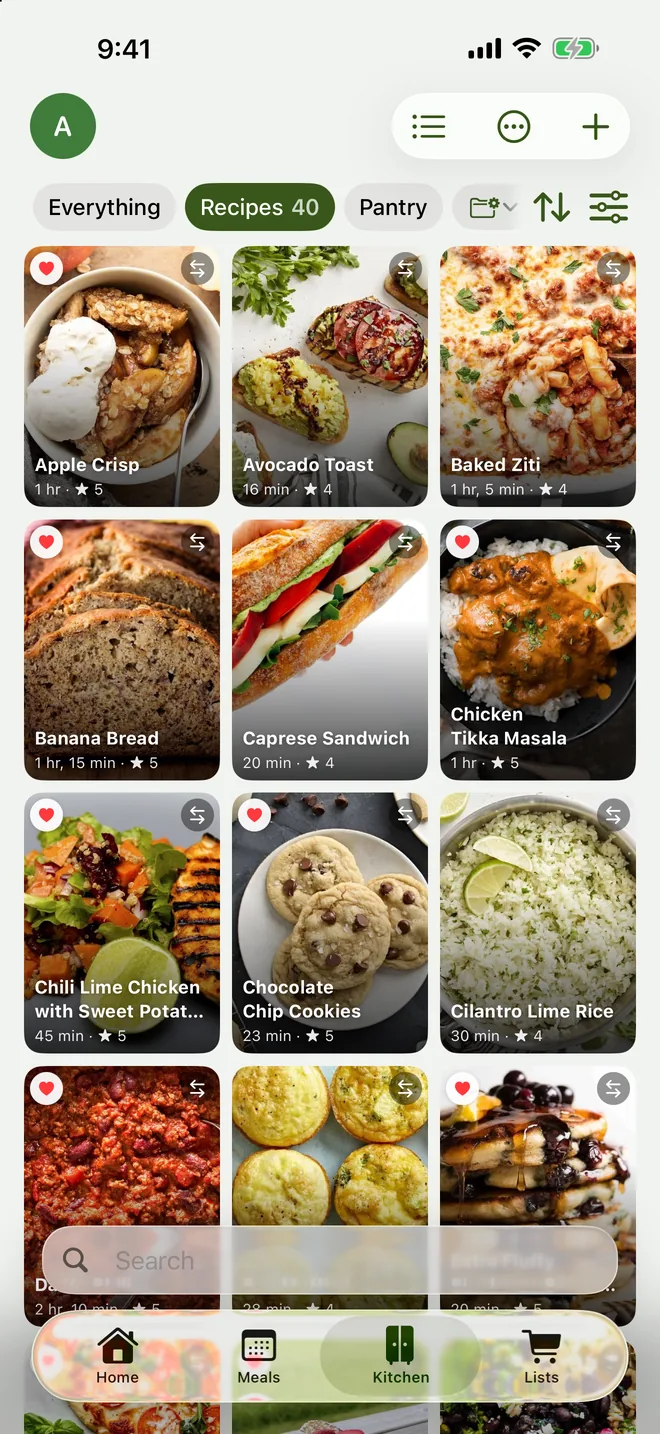
The Recipes + Pantry tab has a new name and new cards that show cooking times and how much you have left. Your recipes and pantry items are right where you left them.

Good to know

  • Buttons along the top switch between Everything, Recipes, Pantry and your Saved Filters.
  • Pinch the grid to switch between small and large cards, or switch to a list.
  • Tap the round badge on a recipe card to turn it over: servings, when you last made it, what’s planned next, and how many ingredients you have.
  • Touch and hold anything for Edit, Add to Meal, Favorite and more.
Kitchen tab showing recipes as a photo grid with ratings and times

Redesigned filters #

Filtering recipes and pantry items is faster and easier. Filter by tags, ingredients, nutrition, price, what’s running low and more. Active filters show as buttons you can tap to change or remove, and when nothing matches you get suggestions for what to loosen.

Good to know

  • As you type in search, matching tags and ingredients appear under Add as a filter.
  • Choose Save These Filters… to keep a set as a Saved Filter (these were called Smart Lists). Turn on Show on Home to see its first few items on Home.
  • Group the Kitchen list By Tag, with headings you can fold away.

Pantry and nutrition

2 new features

Your pantry keeps up with your cooking #

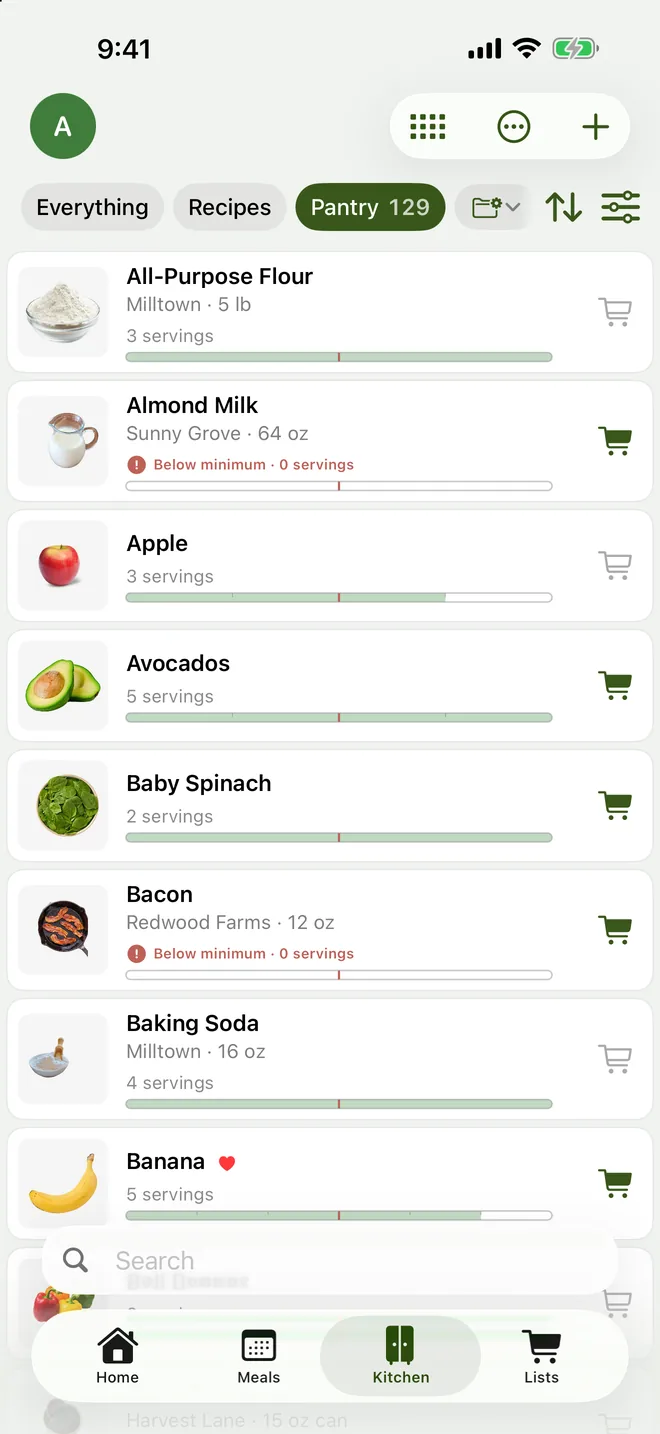
If you keep count of the food you have, it now comes out of your pantry when you make a planned meal or tap Made It on a recipe, and goes back in when you clear your cart after shopping. Extra servings are kept as leftovers.

Choose how closely to keep count

  • Automatic — goes up when you buy it, down when you cook. When it runs low (counting what planned meals will need), it goes on your list.
  • I’ll Update It — you change the amount yourself.
  • Have It or Not — a simple switch. Buying it switches it on.
  • Don’t Keep Count — not tracked.

Good to know

  • Planned meals can leave the pantry On the Day (by themselves, a couple of hours after the meal) or When I Confirm. Either way, you can put back anything you didn’t make.
  • Tap a pantry item to see how much you have, upcoming meals that use it, its price at each store, and the recipes it’s in.
  • Turn it on in Settings → Keeping Count.
Pantry list with photos and stock bars

Nutrition your way #

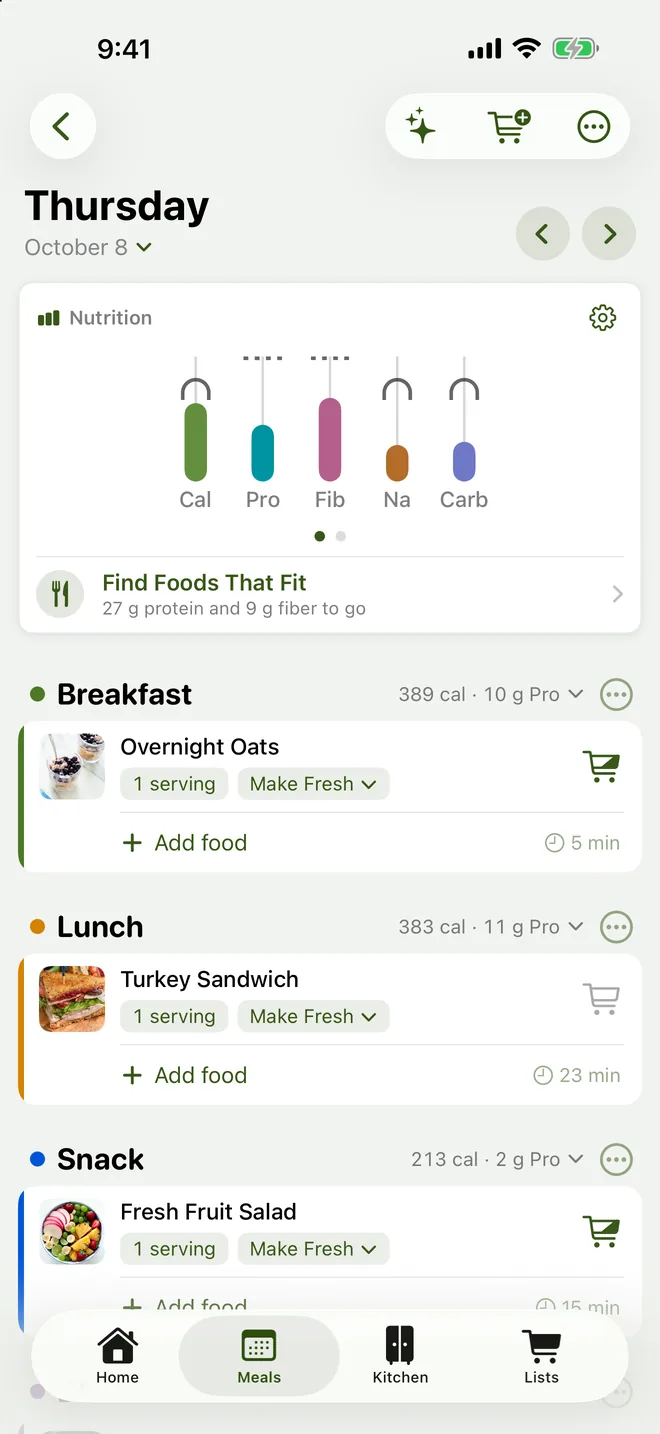
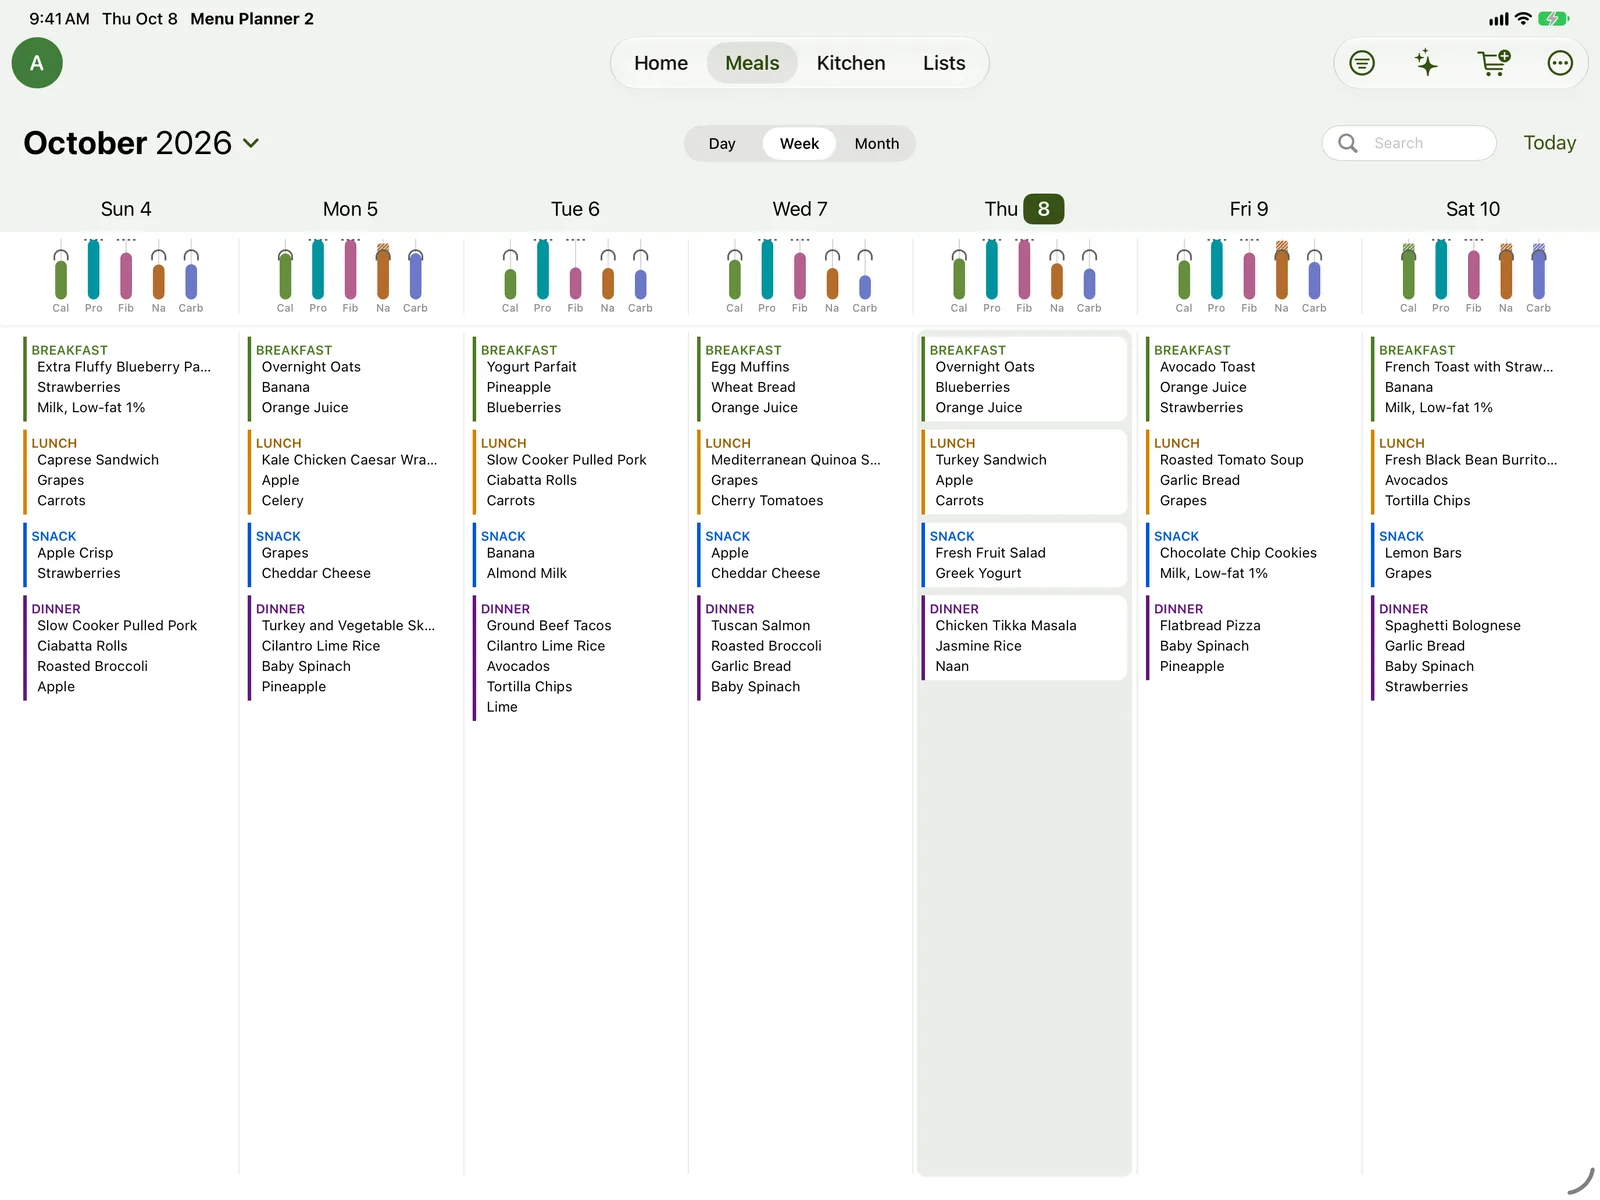
Choose which nutrients show on your meal plan — up to five. Calories is now one of the choices instead of always being there. Give one a daily goal and each day shows a bar for it; on iPad, the week view shows a small chart for every day.

Good to know

  • Tap Nutrition on a recipe to see what’s in one serving, against your own goals, with each ingredient’s share of the calories.
  • Scan a nutrition label with the camera — even one with several columns, printed per 100 g, or in English, Spanish, French, German, Italian or Portuguese. Or Look Up Nutrition Online.
  • Vitamins A and C are included now, too.
  • Fill In Recommended Values starts your goals from official daily values. Each goal can be At least, At most or Between.
  • Recipe nutrition looks low? The app now tells you which ingredients weren’t counted and what each one is missing.
A day’s nutrition bars above breakfast, lunch and dinner

Sharing and your account

3 new features

Share with your household #

Inviting needs Premium + SyncJoining is free

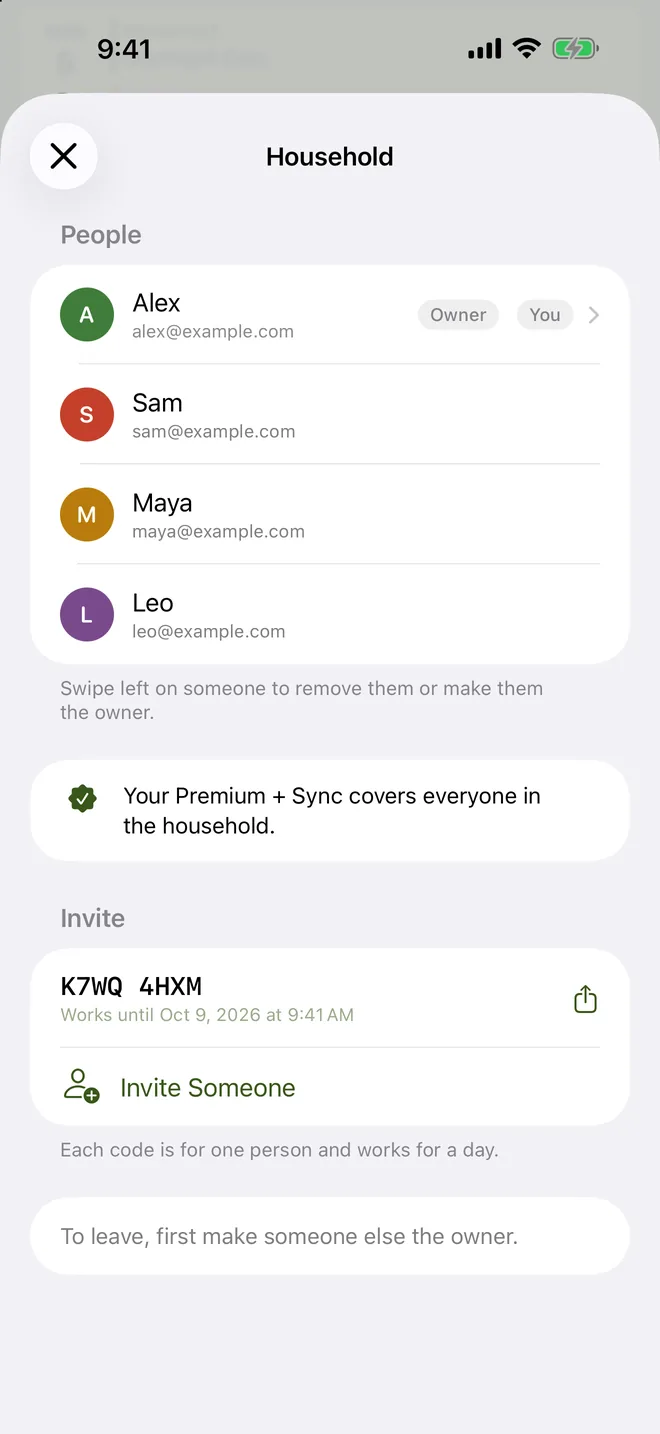
Invite up to five people — family, a partner, friends or a roommate — to share your recipes, meal plans, shopping lists and pantry. Everyone uses their own iPhone or iPad with their own sign-in, and an item checked off in the store disappears from everyone’s list within moments.

How to start one

  1. Tap your picture at the top left, then Household.
  2. Tap Invite Someone. You get a code that works for one person, for one day.
  3. Send them the code, or let them scan the QR code with their camera.

How to join one

  1. Sign in to Menu Planner 2 with your own account (it’s free).
  2. Tap your picture, then Household → I Have an Invite Code, and enter the code.
  3. Pick which profile is you, or add yourself.

Good to know

  • One subscription covers everyone in the household, whatever Apple Account each person uses. If anyone in the household subscribes, everyone is covered.
  • Your shopping list shows who added each item, and each person’s device opens on their own meal plan.
  • Joining doesn’t mix your own recipes into the household’s. They’re kept safe in your account and come back if you leave — or you can leave with a copy of the household’s instead.
  • The person who started the household can remove someone or hand over ownership.
Household screen listing four people, the note that one Premium + Sync covers everyone, and an invite code

No account needed #

You can now use Menu Planner 2 without signing in: tap Continue Without an Account and everything stays on your device. You only need a free account for Premium + Sync.

If you sign in later on a phone that already has recipes and plans, you choose what happens: Add to My Account combines them, or Use My Account Only replaces them. Nothing changes until you choose.

Sign in without a password #

There’s no password to remember any more. Sign in with a code sent to your email, or tap Continue with Apple or Continue with Google.

If you were signed in before this update, you’ll be asked to sign in once more. Use the same email address and all your data is right there.

On your iPhone and iPad

4 new features

Home Screen and Lock Screen widgets #

Some widgets need Premium

See what you need without opening the app. Touch and hold your Home Screen or Lock Screen, tap Edit or +, and search for Menu Planner 2.

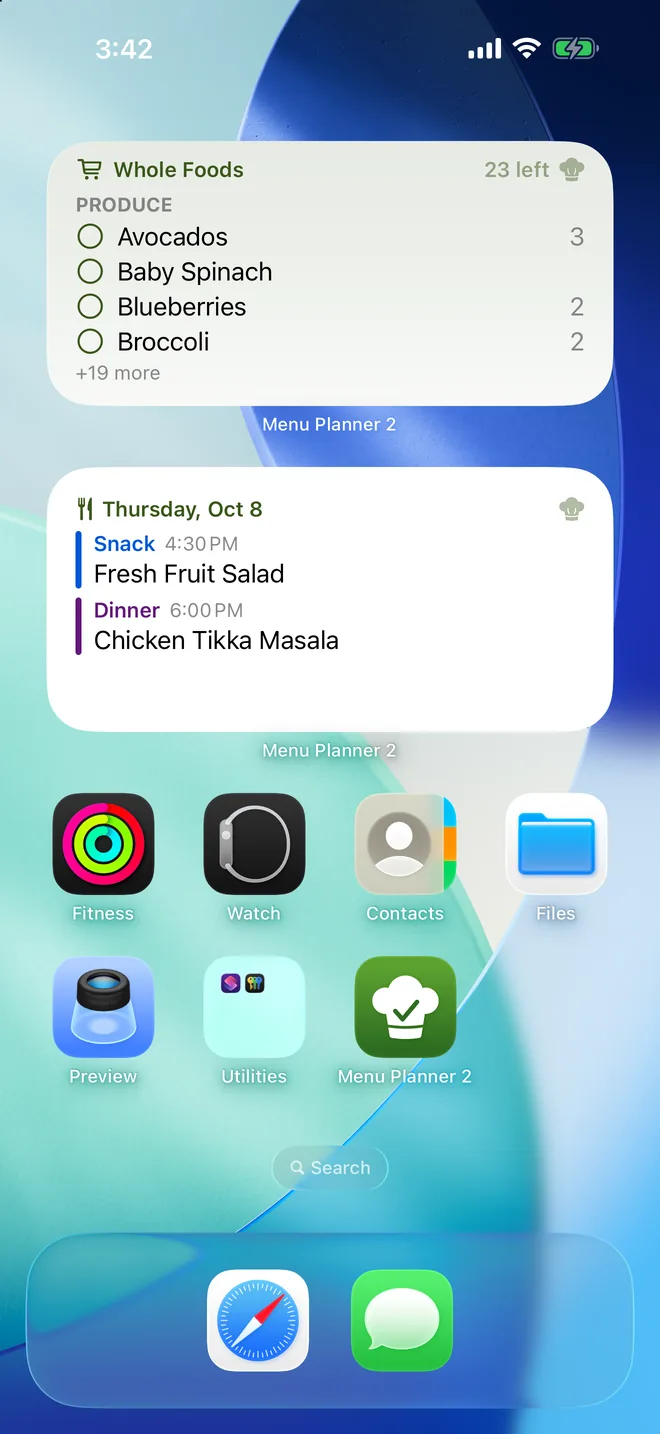
  • Today’s Meals, with the next one up front.
  • Shopping Checklist — check items off right on your Home Screen, grouped by aisle if you like.
  • Running Low and Missing From List, with buttons to add them (Premium).
  • Store Count, Recipe of the Day, Nutrition Today, and with Premium, Frequent Adds.
Shopping list and today’s meals widgets on the Home Screen

Siri and Spotlight #

Ask Siri to add something to your list, tell you what’s on your meal plan, or open your list:

  • “Add to my Menu Planner 2 list”
  • “What’s on my meal plan in Menu Planner 2”
  • “Open my Menu Planner 2 list”

On iOS 18 and later, your recipes also show up when you swipe down and search your iPhone. And the Shortcuts app has actions to import a recipe from a website or text, add to your list, search your recipes and more.

Controls and the Action button #

iOS 18 or later

Add Open Shopping List or Scan a Barcode to Control Center, the Lock Screen, or the Action button on iPhones that have one.

Multiple windows on iPad #

Open Menu Planner 2 in more than one window — your meal plan next to your shopping list, say. Each window keeps its own place, and a change in one shows up in the others straight away. On iPad you can also drag a food from the side panel straight onto a meal or your list.

iPad week view with a nutrition chart for each day

Make it yours

3 new features

Themes and profile pictures #

Most themes and looks need Premium

Pick a theme for the whole app — each has a color for Light Mode and one for Dark Mode — or make your own with Custom. Give each person their own color and initials or emoji, so you can tell at a glance whose plan you’re looking at. And choose from a new set of app icons.

Default and No Theme are free, and you can try any theme, color or emoji before you buy.

Now in six languages #

Menu Planner 2 is now available in English, Spanish, French, German, Portuguese (Brazil) and Italian. It follows your device’s language, or you can pick one just for Menu Planner 2 in Settings → Language.

Help when you need it #

Tap your picture, then Help, to search answers to common questions, run Quick Setup again, see tips again, or contact support with the technical details I need to help — without leaving the app. The same guide is on this website: see the Help Guide.

What works differently now

  • Signing in: you no longer need a password. Sign in with a code sent to your email, or with Apple or Google. If you were signed in before, you’ll be asked to sign in once more.
  • Settings moved: the button at the top left is now your profile picture. Tap it to switch profiles, open Settings, or get help.
  • Shopping list Grid view: the Grid view has been removed. If you used it, your list now shows as List with Images.
  • Colors: instead of picking your own light and dark colors, choose a theme, or make your own with Custom.
  • Names: the Recipes + Pantry tab is now Kitchen, and Smart Lists are now Saved Filters.

Bug fixes

  • Fixed an issue that could make images disappear.
  • Fixed an issue that stopped image search from working.
  • Shopping list quantities now sync between your devices.
  • Shopping list items can no longer turn up twice after a sync.
  • Fixed many other problems with syncing and with how screens look and work.

Get version 1.1.0

Already have Menu Planner 2? Update from the App Store. New here? It’s free.

Download on the App Store